
Make a fortune tellerThis shape comes from my childhood. We used it as a fortune teller. But it could also be used to hold four small things, such as sweets. Grey lines are folds or creases. They are important. Fold accurately, and crease well. New creases below are marked in red. The black lines show edges. The thick black lines show where there are flaps. The paper should be a square. If it isn't, cut a strip off one edge to make it so. The diaginal folds in the first step can help with this. |
 |
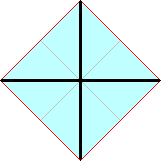
 Fold diagonally both ways to find the centre. |
 Fold the points to the centre. |
 Turn over. |
 Fold the points to the centre. |
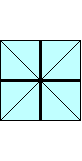
 Cress all lines well from corner to corner, and from mid-point to mid-point. |
 Turn over. |
 Lift up flaps and put thumbs and first fingers in. |
 Pinch together thumb and finger on each hand and pull gently apart a bit. |
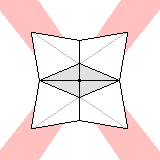 Pinch together thumbs and fingers and pull apart the other way. |
To use this as a fortune teller, you should mark the flaps inside (where you can see them as you pull the teller apart slightly) as in the last two steps). Give them different colours, or words. Then lift up the flaps and put the answers to questions, such as YES or NO or MAYBE or NOT YET or NEXT WEEK.
Get someone to ask a question (which can be answered by your answers!) Then pull the fortune teller apart one way then the other, as in the last two steps, several times. Ask them to chose a colour or word that they can see. Lift the flap to give the answer.
 |
If you turn it upside down, it makes a container with four pockets. You could put a sweet in each, perhaps, or a few nuts or raisins. |
© Jo Edkins 2013 - index to Christmas index