Cable
Cable
If you are left-handed, then change the option below, and all diagrams and descriptions will alter to suit you.
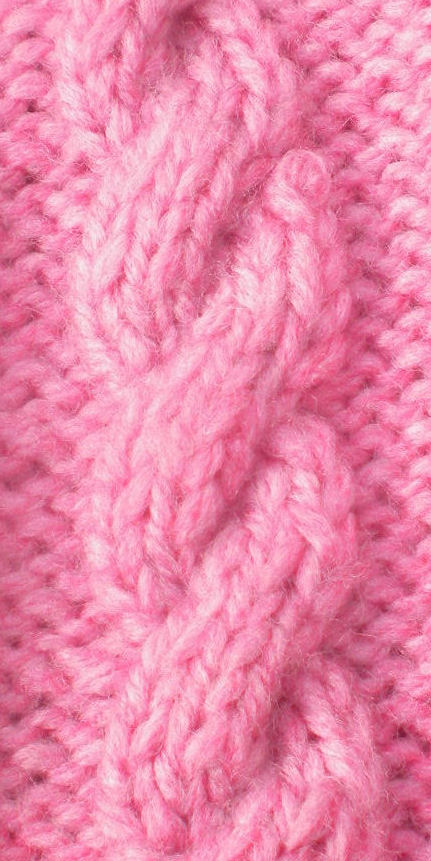
How to work Cable - Photo of back - More complex designs
Cable is a way of manipulating stocking stitch to produce the effect of twisted strands, making a rope (or cable). I suggest that you are comfortable with stocking stitch before starting this!

You will need a small double-ended needle to do cable stitch. Being small is useful, as you will end up having three needles attached to your knitting at the same time, at one point, and it helps if one of them is small, and not getting in the way! "Double-ended" means pointed at both ends. This is essential, as you take on stitches at one end of the needle, and knit them from the other.
A cable consists of two or more strands twisted round each other. Each strand is the same number of stitches, say two or three stitches. This description has two strands of two stitches each.
Cable may be framed by some reverse stocking stitch on each side to make it more prominent. This isn't essential for the cable process to work, but it might make it look better.
Stocking stitch has a smooth side (front) and a knobbly side (back). I advise that you do the actual cross-over of the cable when working on one of the knit stitch rows. That means that the front, smooth side of the knitting is towards you, and you can work out how to manipulate the needles.
Cable stitch can end up very tight, so I suggest that you make the stitches before, during and after the cable looser than usual.
|
Do several rows of stocking stitch before you do the actual cable cross-over. |
Comments: The last of these rows should be a purl stitch row (see above).
|
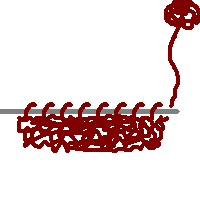
Do the knitting up to the start of where the cable will be. |
|
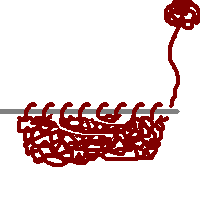
Pick up two stitches onto the third needle. This is one of the strands. |
Comments: No knitting is involved at this stage. You just transfer the right number of stitches from one needle to another, in the same order.
The third needle is the small double-ended needle.
|
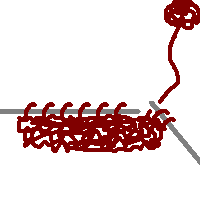
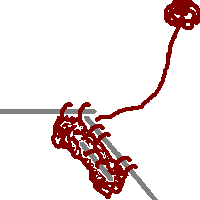
Move the third needle out of the way, either in front or behind of the main knitting. |
Comments: You have to decide which way the cable is twisted. This example shows the third needle in front of the main knitting, which makes the twist go one way. Putting it behind makes the twist go the other way.
|
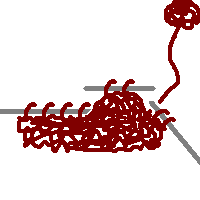
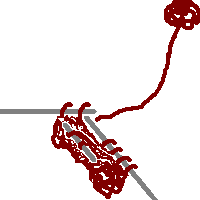
Knit two stitches from one big needle onto the other. Ignore the third needle at this point. |
Comments: Things are getting a little tight at this stage! The stitches going to the third needle do bunch up and drag on the main knitting.
Be very careful that you don't drop any stitches off the third needle. It is double-ended, so stitches can drop off either end. Make sure that the stitches on that needle are in the middle of the needle, rather than at one end, to prevent this.
|
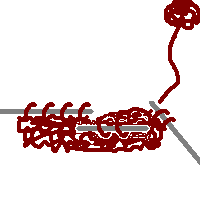
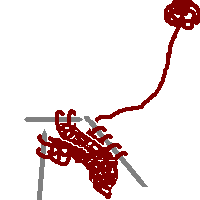
Push the knitting done so far together. Pull the third needle into the gap between the other two needles, dragging its stitches with it. |
|
Put the third needle into position to start knitting from it. Push the unneeded big needle out of the way. |
|
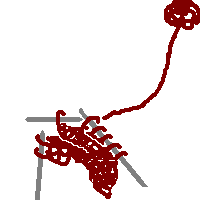
Knit the third needle's two stitches onto the big needle, releasing the third needle. |
Comments: Things are getting very tight at this stage!
|
Carry on with the rest of the row, using the two big needles. |
Comments: It won't look like this. The stitches will be squashed very close together.
You then carry on doing more rows, The cross-over will appear better and better as you go on. Do an odd number of rows before starting the next cross-over. I suggest at least five. There has to be an odd number, because the next cross-over, like this one, should be done on the knit stitch row, so the front is towards you, and you can see what's going on.
It is possible to do cable without a third needle. You can slip the two (or three) stitches onto a large safety pin (which has the advantage that you can close the pin and the stitches won't slip off! Then, when you need to knit thos stitches, slip them back onto the relevant needle before knitting them. I haven't used this technique, so I don't know what the problems or advantages are.
Cable stitch looks very different on the back! That is why I advise that the important rows are knitted from the front, so you can work out what to do (without turning the knitting round all the time).

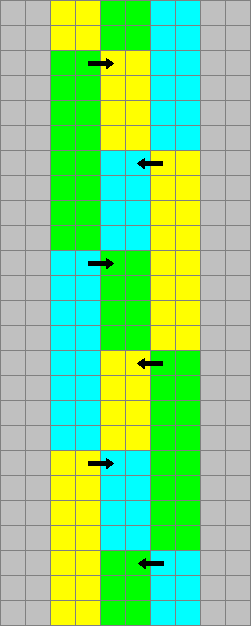
Once you understand the principle of cross-overs, you can manage more complex shapes. Here is a representation of a simple twist, with two strands, three stitches wide, crossed over every 6 rows (i.e. 5 normal rows between cross-over rows). The different colours represent the stitches in the different strands. The arrow shows which stitches go over which. You could do the opposite, and have the twist go the other way.
 |
 |
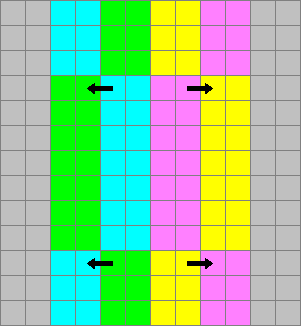
Here is a plait, with three strands of two stitches each. You will need to be careful to make the twist go the correct way (although it's quite a fun effect if you get it wrong!)
 |
 |
This is just two cables, side by side, twisted in opposite directions, but it produces an interesting effect.
 |
 |
© Jo Edkins 2021 - index to all my websites - any questions or comments, email me