These beads run along the edge and the bigger area of honeycomb. See pattern 72.
A bead is used in Bucks Point. It is a unit of honeycomb surrounded by gimps. I suggest that you understand both these before trying beads.
Bead pattern
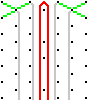
The diagram below shows two beads, but only one has its working shown in detail. It avoids the complexities of the individual stitches by showing each pair of threads as a single line. Where one line crosses another inside the bead, you should work it as half stitch and twist, pin, half stitch and twist (or honeycomb). These are marked in grey. The gimp is shown in red. Click here to see how to work a gimp. Outside the gimp is not part of the bead, and so will be worked in whatever stitch is required - perhaps a headside or ground. These outside stitches are marked in green.
|
|
Working: First work all lace above the bead, down to but not including the gimps. These will be 'outside' stitches. There are 4 pairs and 2 gimps needed to make a bead.
Work the left 2 pairs through the left gimp, and the same with the right pairs and gimp. That means that all 4 pairs have moved from outside the gimps to inside.
Work the middle 2 pairs, then the left 2 pairs, then the right 2 pairs, all as honeycomb. This is the top of the bead.
Now work the left pair through the gimp, and there will be one stitch (and pin) outside the gimp. This may be ground, or headside, and it is marked in green. Now work the left pair back through the gimp. Work the two left pairs as honeycomb. Do the same with the right pair (across the right gimp, one stitch outside the bead, and return through the gimp to work the right two pairs as honeycomb).
Work the middle two pairs as honeycomb, as the bottom stitch of the bead. Then work all pairs back through the two gimps, left and right, so they end up outside the gimps. The gimps then cross each other (it does not matter which one goes over which!) That completes one bead. Before the next bead, you will have to work the rest of the lace between the two beads - marked in green.
If one bead is directly above another, then you cross the gimps between the beads, and carry on.
Sometimes the beads are offset. That may mean that the gimps are doubled between the beads. I suggest that you do the top bead, then get the gimps to the correct place for the next bead. There should be four pairs inside the gimps before you start working the bead. If not, then you have made a mistake!
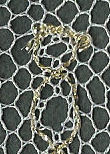
It is possible to have a small bead. This is a diamond (with 4 pins) instead of a hexgaon (with 6 pins). The photo below shows a small bead above a normal bead.
Or you can have a mini bead, with just a single stitch inside the gimps.

© Jo Edkins 2016 - return to lace index