Pins in use, making bobbin lace

Click here for how to find a pattern, and pricking it.
Once that is done, pin the pricked pattern on your pillow. A small pattern can be pinned in the middle of the pillow, but a larger one may need to pinned towards the top of the pillow. Remember, you will need to have your bobbins hanging downwards, below where you are working, even when you are working the bottom of the pattern. If the pillow is not big enough for that, then you may need to consider getting a roller pillow, or a bolster, or a block pillow. Click here for more on pillows. When you pin the pattern, you will need one pin per corner, pushed right in up to their heads. This is because the pattern must be held firmly, and you do not want these pins getting in the way of the threads while you are making the lace. You also need to put in the top pins of the pattern. For my patterns, these starting pins will have little numbers by them. These tell you how many pairs of bobbins will be hung from that pin. These starting pins are not pushed in right up to their heads. Like all working pins in bobbin lace, they are pushed in far enough that they do not get pulled out again, but not too far. Threads will be held in place by these pins, and you do not want the threads to slip off the tops. Say - about a quarter of the way in (but you will figure how far for yourself quite quickly, once you start making lace!)

Pins in use, making bobbin lace
Now get ready your bobbins and your thread. Make sure that you have enough bobbins for your pattern. (If not, buy some more, or choose a different pattern!) You need to wind thread onto the bobbins. This is done in pairs, so that one end of a long piece of thread is wound onto one bobbin, and the other end is wound onto a second bobbin, so they end up connected with thread. This is how you do it.

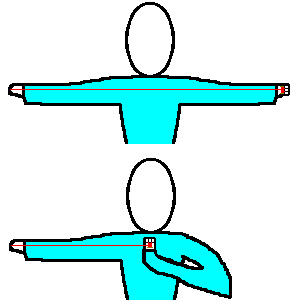
Measure out a piece of thread. Do not cut off the thread once measured! The diagram above shows two lengths that I commonly use. For a longer piece of thread, I measure from one hand to another with arms outstretched, and for a shorter, one out-stretched arm to the middle of my chest. This is a quick way to measure thread, and also a traditional, even ancient method. Units of measure often started with the proportions of the human body! This measure is just for one bobbin, by the way.
|
|
I have used black thread and grey bobbins in the diagram above to make it easier to see.
Now wind the loose end onto one of a pair of bobbins. (Bobbins are often sold in pairs, with similar spangles, for example, and it makes sense to wind these as a pair.) Carry on winding until most of the loose thread is wound on. Make a loop in the thread, twist the loop, and slip it over the top of the bobbin. If you've twisted the loop the right way, this will stay attached to the bobbin. Lay this bobbin down. Remember that the thread on it is still attached to the reel at the other end.
Measure a similar amount of thread from the reel, and now cut it off. Take the loose end, and wind it onto the second bobbin in the same way. Sometimes the first bobbin's loop gets detached from its bobbin while this happens! Just slip the loop back on again. When the second bobbin is wound, then make a similar loop, twist it, and slip it over the bobbin top in the same way.
You should now have two bobbins, wound with thread, and attached together. Hang these (carefully!) over one of the starting pins. Carry on winding the rest of the bobbins, and hang them in the same way.

Some pairs may have to be hung on the same pin.
Once all bobbins are hung, you are ready to start making the lace. A warning: bobbins which are hung on pins and not yet worked into the lace are vulnerable. I once dropped my pillow at this stage. Half the threads bounced off the pins, and got entangled in other pins, and it was an appalling mess! It would probably have been better to cut the threads off the bobbins, throw the tangle away, unwind all the bobbins and start again. But I gritted my teeth and managed to untangle the mess. It took some time. There is a way round this (apart from not dropping your pillow!) Once you have hung a few pairs, start making the lace with them, and gradually hang more pairs, and work them in as you go. You need a little knowledge of lace to know which pairs to hang first, and how to work them, so perhaps you will not be able to do this right at the start. But once you can, I do recommend it, especially once the number of pairs in a pattern increase. You may wonder why this helps. Surely dropping a pillow causes chaos whenever you do it! Well, I would not recommend it. But once the threads are worked into the pattern, they cannot jump off their pins. You only have to figure out which bobbins have jumped over which. That is a lot easier (although I recommend a good light to see what you are doing).
Click here for how to start making lace.
© Jo Edkins 2016 - return to lace index