
Click here for Panama lace patterns.
I am not an expert on this! But someone wrote to me who was interested in learning how to make this lace from the country of Panama, and here are some patterns that I have made for her. The patterns and the explanations come from my own guesses, looking at the photos. They do not come from a knowledge of their culture of lacemaking. But I think these are attractive designs of lace, and deserve a wider audience.
Looking on the web, I think that bobbin lace in Panama is called mundillo and it is used to make their national dress, called pollera. It is an attractive but simple lace, geometric in form. Some seems based on Torchon, but it also uses tallies to make leaves. The important thing seems to be that it uses colour in a very clever way, which high-lights the design.
I am not sure what scale the patterns are. Of course any lace can be varied in size, but a large pattern will need a thick thread. I think it is quite important to have a tight weave on the cloth stitch, so make sure that you have a thick enough thread for the pattern size that you chose. (Too thick a thread will lead to coggles, so be careful about this as well.) I have made the pattern size large, so you can see where the colours go, which is also important. You may be able to change the size of a pattern when printing out, if your printer allows this, or some copiers allow you to change size. Or, of course, you could draw out your own pattern, using graph paper, or one of the blank grids (use a square grid). I have also put 'blobs' at the start of each pattern, showing where which coloured pair starts where (which is also important!) I have put these at both ends, so you can work the pattern either the British way, or the other way round. I don't know which way round is the traditional Panama way.
In fact, looking on the web, it could be that much of this lace is made without a pattern at all, perhaps just using a striped cloth on the pillow to work out distances, and doing everything by eye, a technique known as Free Hand Lace (see pattern 192 for a possible European example). However, here are the patterns if you want to use them! I suspect that traditionally pins are used mainly at the edge of the lace only (apart from the fans and the diamonds). This gives a different look to some of the stitches, and is faster to work, since putting in a pin always takes time. But the pins make working the lace easier, and since I think these designs would be good for beginners, I have given the pinholes in the middle. Ignore them if you wish!
The grid varies. This is to be expected if the designed are worked as Free Hand Lace. In the patterns, I have tried to approximate the grid used.
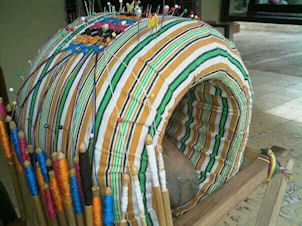
The pillow is of an interesting form. It is a cylindrical pillow, similar to the bolster pillow which used to be used in English Midland lace. However, it is hollow. The advantage of a cylindrical pillow is that you can carry on making as much lace as you want without the lace falling off the pillow, since you move the pillow round and round to expose more working surface. However, you can use whatever pillow your want. A block pillow, or one with a small roller, will also allow you to make long pieces.
Click here for an external website describing more about this lace.
© Jo Edkins 2017 - return to lace index