
Click here for roundel patterns.
A conventional lace edged square mat looks like this:

Click here to see how to do that. The square edge pattern has lines from point to centre for each corner which tell you where to turn the pillow, and also give a good place to start the pattern. If there is no line drawn on the pattern, it is fairly easy to identify such lines for yourself.
It is also possible to have a lace edged circular mat, or perhaps a circle of lace with a hole in the centre:
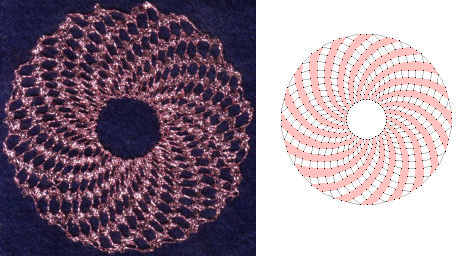
These circular edges have no obvious lines, and no well-defined points to turn the pillow to work the next side. There are, indeed, no straight sides. Once you have started, you work a bit of lace, then turn the pillow slightly to work the next piece. The pin holes on the outer edge are further apart than those near the centre, and it is this that bends the pattern round to make the circle. The working of the lace is quite simple, as long as you concentrate on the few stitches that you are working on, and don't look at the curving lines in front or behind! The pins near the centre can cause problems if they are too close together. You may need a good light falling on the lace to find the holes to put the pins in. The pin holes round the edge are further apart, and that means you may need to twist the edge pairs more than you normally do, as the threads travel further from pin to pin. An extra twist or two holds the pair together, and strengthens the edge.
Starting may be a bit trickier. The pattern may help. What you need to do is find a line going from edge to centre. The line will look rather odd, because it is curved:
This (despite its shape) is a diagonal line, and each pinhole on it will have one pair starting at this point (apart from the pin hole right at the edge, which has two pairs). Since this is a diagonal line, you may find it easier to work if you take the previous row of pins as false pins:

Hang the bobbins from those, work the pairs into the start of the lace, remove the false pins, and pull the threads through so they now hang on the real starting pins.
Once started, you continue, working the lace as you would normally work a straight piece of lace, and trying not to get distracted by those curves! Pairs tend to come in from a different angle to what you're used to, but as long as you don't make a mistake (!) things should end up where they're supposed to be. You turn the pillow bit by bit as you work your way round the pillow, and eventually you will end up back where you started. Your threads will get caught up in the pins further back as you turn, so remove those in the way, but do not remove the first two rows of pins. Instead, push them into the pillow up to their heads.
The finish of the lace is done similar to a mat or square edge. Click here to see how.
It is best to work this type of pattern on a cookie pillow, or other round pillow. You can use a square one, but since you turn it gradually, rather than a whole corner at once, you can end up with the corner of the pillow sticking into your stomach!
© Jo Edkins 2016 - return to lace index