
Click here for patterns for cross.
A bobbin lace cross is an attractive shape, which is surprisingly easy to work, especially if you start from the middle. There is another way to work a cross, starting from the ends. Click here to find out how to do that. You should find it possible to work a cross pattern using either technique, although there may be differences at the centre or the ends. In my cross patterns I say which technique I used for any particular pattern.

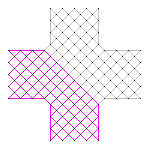
When working out how to work a cross from the middle, you must imagine dividing it into four, as above. This makes four distinct parts of the cross, with each arm being a simple strip of lace. One of these is coloured pink above, so you can see its shape. The strip must begin with a pointed start. It can end in a horizontal line, as above, or in a more complicated way, as in the photo. But the start must be pointed.
Making such a strip of lace is easy. You can make a cross by making four of these, and sewing them together (using needle and thread) to produce a perfectly acceptable result.
However, a lacemaker would probably prefer to make the whole cross at one time, with the complete pattern pinned on the pillow. There are still different stages, of course.

Starting from the centre, which is the top of the first arm, hang the bobbins (you can use some of the holes in the rest of the pattern as false starting pins.)

Work the first arm, according to the pattern. Leave the pins at the start, at least two rows. Tie off and cut off the threads to finish off this arm.

Turn the pillow. It is advisable to use a cookie pillow for this technique!

Hang the bobbins for the next arm. Half need to be joined to the previous arm. Identify which pinhole in the previous arm needs to be joined. Remove this pin. (The lace should be held in place by the second row of pins.) Use a needle to thread the new thread through this pinhole, before winding the thread onto a pair of bobbins. Replace the pin. This is not a false starting pin, as it attaches the two bits of lace.
The other half of the bobbins are just hung from pins, as that bit of lace has not been worked yet. These are false starting pins.
Work the second arm. Tie off and cut off the threads to finish it off.

Turn the pillow again, and hang the bobbins, again half from existing pinholes, to attach this arm to the previous, and half just from pins.

Having worked the third arm, and tied off the threads, turn the pillow for the last time. Now all the bobbins must have their threads attached to previous arms by being threaded through existing pinholes. Half are attached to the last arm (the third), and half through the first arm.
All done!
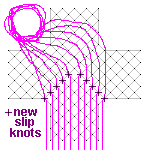
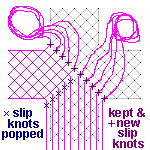
There can be problems finding the relevant pinhole with your needle, so there is an alternative way of starting at the centre. You start by measuring out the thread as usual, but instead of winding it onto both bobbins, you only wind half of it onto one bobbin. Make a slip knot close to the bobbin. Slip the loop over the starting pin. Pull tight. For the 'pair of threads', you will need the same amount of thread again, wound onto a second bobbin, with a second slip knot, put onto the same pin. You now have two long ends of thread coming from this pin as well as the two bobbins. Carefully lift these threads out of the way towards the back of the pillow. Carry on doing this for each 'pair' of bobbins. Now gather up all these loose threads, wind them into a loop, and pin this somewhere out of the way, to stop the whole thing getting in a tangle!
Work the first arm, as before, keeping the first two rows of pins, including the pins with slip knots. Turn the pillow. Now undo the loop of spare threads, and sort out which threads you need. Take the first thread and wind it onto a new bobbin. Take out the pin with the slip knot on, and gently pull the thread until the slip knot 'pops' and disappears. (If it doesn't, then just leave it. The chances are that no-one will see it! But the effect is better if you can get rid of the knot.) This new pair of threads are now hanging from the start of the first arm. Carry on with the rest of the threads needed for this arm. That will be half of them. Gather up the threads not used, which are still loose, and wind them into a loop as before, and pin it out of the way. You will need to start the second half of the bobbins for this arm. These will be wound as individual threads, hung from slip knots, like the first arm. The spare threads from this second half also need to be wound into a loose loop and pinned back. So now you have two of these loops!
Carry on doing each arm in turn. The last arm will use up all the threads left.
The following show this technique in action:

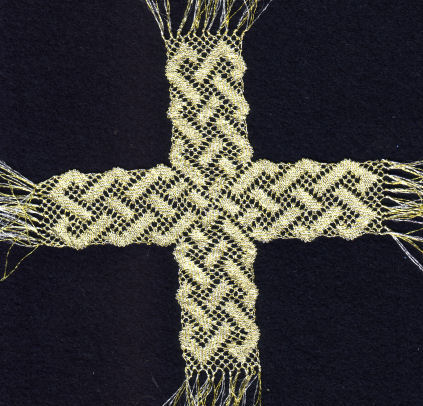
The finish of working a cross happens at the ends of the arms, so it is possible to finish each arm with a fringe. I did this to finish off the Celtic Knot cross, above.
These loops of spare thread can be a nuisance. If there are not too many bobbins in the pattern, then you can wind each thread as usual, with a pair of bobbins. But then you make the slip knot in the middle and hang it from a pin. You use only one bobbin for this arm, and you carefully lift the other bobbin towards the back of the pillow, out of the way, to be used for a different arm. The principle is the same - you just have a collection of spare bobbins with thread, rather than a loop of spare threads! Of course, you must have enough bobbins to do this (it uses three times as many bobbins as the pattern really requires).
© Jo Edkins 2017 - return to lace index