
Click here for patterns for triangles.
A bobbin lace edging to a mat can take a long time to work. A triangle replacing or sewn onto a corner is a much quicker way to decorate a mat. There are two ways to work such a triangle, either as part of a strip, or as the corner of a square edging. This page describes the strip triangle. Click here for the corner triangle.

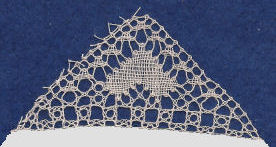
You can either cut off the corner of a piece of fabric and replace it with the lace triangle (left, above), or the lace is sewn onto the fabric, which provides a background (right, above). In fact, in the example above, a small bit has been cut off the fabric as this is not quite a true triangle.
The easiest way to produce a triangle is just to work the shape from a normal strip of lace. You start on a diagonal, and once started, you immediately begin finishing on a diagonal sloping the other way.
Below is how the triangle fits into a normal strip of lace, and an example of a triangle pattern.

The start, being a diagonal, will probably require false pins for a neat start. If you have a true triangle, then the start line meets the end line, and one pair of bobbins may just do a single stitch, like one quarter of a square mat.
If the corner is to be sewn onto the fabric, then the edges do not need to be too strong, since the edge of the fabric will protect them. The other advantage of sewing onto the fabric is that the inevitable thread ends left after you have finished the lace can be neatly tidied away by the sewing to become invisible.
If you cut off the corner of the fabric, and replace it by the lace, then the edges becomes more important. First, do not start by cutting off the fabric's corner. Sew on the lace first, onto the flat fabric. Then fold down the fabric where you want to make the join, and trim the fabric but allow enough for the hem.
That deals with the long edge - shall we call it the footside? There are two other edges, the start and the finish. If the start and finish are not to be sewn to the fabric, but dangling loose, then they must be strong. It might be as well to work the top pair through all other pairs at the start and back again, in cloth stitch, and then back again to make the first row of lace. This will give a pseudo-footside at the start (these rows acting like the passives), which will both frame the lace and strengthen it. A similar effect should be done at the finish, as well. The tying off at the finish must be tidy, as people notice raggedness at the edge. Perhaps you could over-sew the end of the lace to catch the loose thread ends, to neaten things up.
The advantages of making a triangle this way:
The disadvantages of making a triangle this way:
It is possible to overcome the problems of the edges being just diagonal starts and finishes by starting and finishing in a more complicated way. It is possible to work across the start and finish with a headside. Then the true start and finish ends up inside the lace. That means the headside gives a strong edge, and the knots at the end are hidden inside the lace. A bit messy to work, though!

This shows the triangle from a strip (this page) on the left, compared to the triangle from a corner on the right.
© Jo Edkins 2016 - return to lace index