
How to do tablet weaving - Interactive pattern designer - Patterns - Theory
Tablet weaving is an ancient craft. You can weave narrow bands with interesting patterns, without a loom.
The only weaving equipment needed are the tablets. These are square pieces of card (or other material), with holes in the corners. Some people use playing cards, cut into squares, which gives an idea of size. My tablets are about 2 inches square. Someone else recommends 6 cms square, about the same. The tablet must be really a square, not a rectangle! Round off the corners of the tablets, or they will catch the threads. The holes should definitely be in the corners, not near the middle, and the edges of the holes should be smooth, not jagged. I suggest that you label the holes on the tablets in some way, either A,B,C,D or 1,2,3,4. This will help you keeping all the tablets the right way up! You can make a pattern with 4 tablets.

You need wool or thread of two colours. Cut it into lengths. While you are learning, I suggest half a yard (OK, metre!). Then thread the wool through the holes of the tablets, making the wool go from the front of the tablet to the back. Which colour goes into which hole is important. This is a good and simple starting pattern. Thread the top two holes with one colour and the bottom two with another. Alternate each tablet as below:

I find it's easiest if you thread one tablet at a time, and then knot the 4 threads together on each side of the tablet. That means that they don't get unthreaded! Make sure that all tablets are the same way up, according to the way that you've labelled the holes. Getting in a muddle at this stage means that the pattern won't work. When all tablets are threaded, put them in a stack, all the same way up, with the wool from the front lying one way, and the wool from the back lying the other way. These bundles of wool need to be combined in some way, either by knotting all the wool on one side together, or by threading them on a large paper clip or something like that. (I worked out this idea to keep the wool roughly in tablet order.) The tablets lie in the same line as the wool, not across the wool (although that might seem the obvious way to do it). The diagram below attempts to show this for two tablets. (I am not suggesting this as a possible pattern! It's just an attempt to make it easier to understand.)

When you knot both ends, note that starting from the left, the wool going to the left holes is shorter than the wool going to the right holes. Starting from the right, the opposite is true, because, of course, the wool is all the same length. In the diagram above, I have bent the wool in some cases to stop one piece of wool obscuring another. The tablets are not separated as I show, either. You should have a neat pile of tablets, and all you can see is the one closest to you, with wool from all tablets coming out both sides.
Now to start weaving! All my diagrams show the wool going from left to right, with the weaving on the right. The conventional way is to have the wool going up and down, with the weaving happening close to your tummy. (The traditional way is to tie one end to your belt and the other to your big toe!) I did it my way because of the shape of the computer screen, and also because I must admit I weave that way. Sorry if you do it the other way! You'll have to turn everything round.
Get another piece of wool, and wind it on a shuttle, or into a loose small ball of wool. This is called the weft. (Because it goes from "weft" to "wight" and back again, as a weaver cheerfully told me once!) It doesn't really matter what colour the weft is, because the weaving should only show the threads from the tablets, not the weft. However, bits of weft sometimes show through, so it's best to make it the same colour as one of the tablet colours, probably the lighter colour is best. I knot the loose end of the weft onto my paper clip to stop me pulling it through by mistake.
Pull the wool straight, by pulling on the two ends (that is, either the knot or the paper clip!) Keep all the tablets together in their stack, the right way up. You should find a gap between the wool from the top holes and the wool from the bottom holes. (If there isn't, then check each tablet. You may have some wool caught on the edge of a tablet, or a tablet turned slightly.) Push the weft through this hole, and pull so there are no loose loops, but don't pull too hard.
Now for the clever tablet stuff! The tablets are in a neat stack. (If they aren't, read the paragraphs above more carefully...) Grasp them in your hand, and turn them through 90° (or a right angle). The tablets lie with the wool as they have done before, but you turn them so they are a different way up (but still in a stack). This isn't easy. The threads have to move over each other. I find it easier to persuade the threads one side of the stack to go to the right place, then the other side. (It's probably easier if all the wool is under tension, but I haven't figured out how to do that yet!) When you've done this, you may want to check all the tablets to see they have all been turned, and that no wool is caught up where it shouldn't be. It might help to slide the stack up and down the wool a bit. The wool tends to catch on the holes, and that gives you the tension you need. A gap should appear between wool from the top and bottom holes again, as before. Now (and this is very important), put your finger in this hole, and push the weaving away from the tablets, towards the start of the weaving. Once you have done several rows of weaving, you can see that this pushes the rows closer together. You can use your shuttle instead of your finger, or anything else that occurs to you. Check again that the are no loops in the weaving.
Now push the weft back through this hole, so it ends up on the side it started on.
And so on. The pattern should appear after several rows. It should be diagonal stripes.

I have said "turn the tablets", but which way? You can turn it clockwise or anti-clockwise. (Perhaps you might consider it towards you / away from you, or to the left / to the right. Figure out your own way of describing it and use that.) At the start, allways turn the tablets the same way, until you can see the diagonal stripes appear. (After a bit, turn the tablets the other way, and do several rows like that. You should get diagonal stripes going the other way. So, turning the tablets one way then the other will give you zigzags.

There is something else you can do with the tablets to produce yet another effect. I have mentioned that you should thread the tablets so the wool goes from front to back of the tablets. Now, while weaving (or at the start of weaving), you can flip tablets, so you see the back rather than the front. Each tablet has to be done by itself, and the wool will need sorting out afterwards to get all the tablets back in their stack (but with the back of the tablet visible rather than the front). If you weave like this, it has the strange effect that a clockwise turn looks as if it's an anti-clockwise turn. (Weird!)
Why do this? Why not just turn anti-clockwise instead? Well, you can flip half of the tablets, and leave the others unflipped. Here, I have flipped the first two tablets:
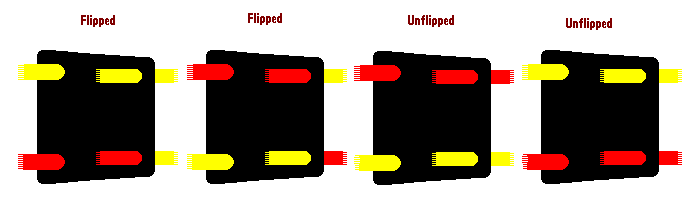
That means that a clockwise turn will produce a clockwise pattern for half the wool, but an anti-clockwise pattern for the other half. For the pattern above, you get chevrons, or arrow heads.

You can combine flipping, and turning both ways. Flip half the tablets, using the pattern above, then do 4 rows turning one way, then 4 rows turning the other. You get a diamond!

Tablet weaving involves turning the tablets, each with its group of 4 threads. This drops some threads and brings up others, which is what creates the pattern, but it also twists each group of 4 threads. They are twisted both in front of, and behind the tablets. On the weaving side, the twist isn't apparent, as it is contained within the weaving itself, and if you push the threads together well enough, it doesn't show. Apparently it can have an effect on the finished product, which might not be completely flat. The twisting on the non-weaving side of the tablets certainly does show while weaving. If you only turn the tablets one way, then each group of threads belong to one tablet does become more and more twisted. What should we do about this? Here are some ideas:
1. Ignore it. Move the twisting behind the tablets as close to the end (and the knot) as possible. Put up with any slight twisting in the weaving.
2. If the twisting behind the tablets gets too much, then undo the knot joining all the threads, smooth out the twist, reknot, and carry on. I read about an alternative method, which involves having the threads run up and down (rather than from side to side). The threads behind the tablets are tied onto fishing weights, and these are at the bottom, with the weaving at the top. The weights hang free, and that allows the groups of threads to untwist if they want to.
3. Be clever about the pattern. If you have something like zigzags, that means that you turn clockwise for a few rows, then turn anti-clockwise for the same number of rows. Turning the tablets the other way untwists the threads. This will also help with the slight twisting in the finished weaving. I am not sure whether flipping and unflipping would have a similar effect. It may do.
Click here for my Tablet Weaving Designer. You can design your own patterns and see how they will weave, using turning either (or both) ways, and/or flipping. It shows the weaving pattern caused described above in more detail.
This website only discusses tablets with 4 holes. You can also have tablets with different numbers of holes. Something for you to explore... I suggest you work out how 4 hole tablets work first, though.
Beginning Tablet Weaving - By Eve the Just
The Ancient Craft of Tablet Weaving
Keith Weaves - Tablet-weaving standard terms and notation
© Jo Edkins 2019 - Return to Crafts index