
One way to start designing your own lace is to try making a pattern from a piece of existing lace. Perhaps you have bought a piece of lace - it may even be machine-made! You like it and want to make a piece like it. Or perhaps you made this piece in the past and have lost the pattern. There are not a lot of free patterns on the web (although there are quite a few on my website!) But there are a lot of photos of bobbin lace, and once you get the knack, you can figure out the pattern for yourself!
I will give the steps for this particular piece of Torchon lace.
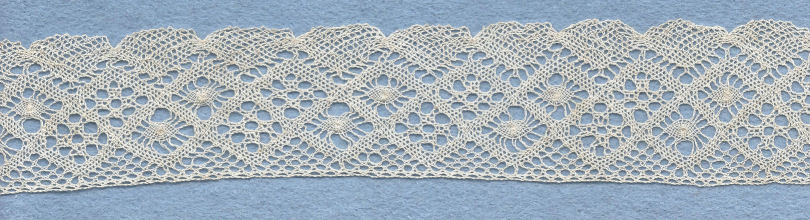
I think we can recognise all the elements in this, so it's just a case of fitting them together.
Download a grid. It should be a Square grid. I suggest a "dots" style grid, and you can choose whatever size suits you.
Start with the footside. It is a twisted footside, so we need the edge - one line through dots - and the passive pair - between the dots. (See getting started.)

There are triangular patches of Torchon ground by the footside. If you count the stitches, there are 5 along each edge. These got left out of old patterns, but I prefer to draw the lines in. In this case, it helps in counting stitches to make sure that you've got the numbers right!

Now for the half stitch zigzags. These can be a bit tricky. They have to fit into the space between two triangular lots of Torchon ground - that's OK. But how wide are they? We can't count pinholes because they aren't any inside the shape! So, are they two pins wide, or three pins? (They can't be one pin wide, as that is no width at all! Four pins wide would be too wide.) Well, let's try three pins wide. I've left the pin holes in so you can see what's happening:

That is quite wrong. We have to fit in four units of rose ground and 16 legged spiders inside there, and there's no room! So let's try two pins wide:
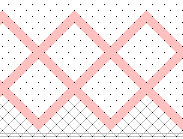
That is a lot better! I've put both rows of the zigzags in, now we are on the right track. When working them, we will have to consider upwards and downwards chevrons, but that's a problem belonging to the working of the lace, not the design.
Now we can add the rose ground and spiders.

The last part are the fans. It might be tempting to put them right next to the zigzags, but you can't put two solid areas next to each other. There are twisted pairs between them. So draw these lines (they are grey) and add the fans on top.

That looks good! You can draw the tops of the fans as you please. They are curves, and so not on the line of dots, unlike the rest of the pattern. There needs to be as many pin holes along the curved edge of the fan as there are on the other two sides. Imagine working the lace - for each row, you need pins at each end of each row.
So now you have a pattern for this lace, and can work it yourself. You might want to count the bobbins. The best way to do this is to draw a line across the narrowest part of the lace, and count how many pinholes on it:

I make it 12 1/2 (as there is no pin hole on the footside). So double that, and add one pair for the passive in the footside, and that makes 26 pairs. If you find this calculation too hard, then just wind bobbins, hang them at the start, and if there aren't enough to work the lace at any point, add another pair! (Click here for more about this.)
The next step is to consider problems and weaknesses in the lace. I've already mentioned the chevrons. The rest of the lace is easy to work (if you don't mind half stitch muddling up the pairs!) However, you may disapprove of the original lace for aesthetic reasons. Those half stitch fans - a bit messy, aren't they! You could work them better than the original lacemaker did - extra twists at the edge would help... But perhaps cloth fans might be better? And do you like the arrangement of rose ground and spiders? A bit linear, isn't it? Would it be better if the top row was siders and the bottom row rose ground? How about three spiders, then three collections of rose ground, etc.? Or even some other sort of ground there? You see - you're starting to change the pattern, and, in fact, design your own pattern!
I hope this shows how to make patterns from an existing piece of lace, and how this can lead you onto your own patterns. If you read the above, you can see how you can try something, and find it doesn't work. In fact, while attempting this pattern I discovered for the first time that zigzags could be as narrow as two pins wide. (I didn't realise that - that was why I tried three pins wide first.) I've used that often since. If you design your own lace, you will make mistakes. But you will learn from those mistakes, and end up making better lace, and understanding lace more. I can really recommend it!
© Jo Edkins 2017 - return to lace index