

This was designed while I was attempting to reproduce the needlepoint style punto in aria. Old needlepoint often has points which are tricky to reproduce with bobbin lace. Here I am exploring an idea. This pattern is connected with pattern 195.
Pattern:
Bobbins: 13 pairs
Style: Torchon wiggle (very experimental!)
Stitches:
half stitch
cloth stitch
cloth stitch and twist
twist single pair
Details:
scallop headside (green)
Torchon ground (grey)
cloth diamond (red)
cloth triangle (red)
footside without passives (grey)
twisted footside (grey)
Description:
Follow the links above for explanation of how to work the different parts of the lace.
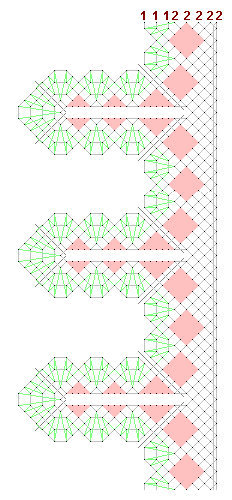
The problem with a Torchon pattern with points is how do you get the difference in width? Here I was trying out an idea which didn't really work.
I start with a conventional Torchon strip. Work this until you meet the dark grey line. This is not part of the pattern, it just shows the end of the easy bit! You can see that the dark grey line does not extend across the whole strip of the lace. At this point, take the seven pairs nearest the footside (which do not cross the dark grey line) and tidy them away to the side. You are not going to need them for a while. Turn the pillow through a right angle, so the point is now straight downwards, and move the remaining six pairs so they hang downwards.
Now work one side of the point. This is, again, a conventional Torchon strip, but there are no passives in the footside, and the cloth triangles reach right to the edge. Carry on until you reach the next dark grey line. Turn the pillow. Work the big scallop at the top. Turn the pillow again, and work the other side of the point, down to the next dark grey line.
Now retrieve the seven pairs that you tidied away, and combine them with the six pairs from the point to carry on working the base strip. And so on.
This can obviously be extended to make the point as long as you want (which was what I was trying to achieve). However, the hole in the centre of the point does gap open. It would be possible to provide a link from one side of the point to the other, to strengthen it, by doing a sewing (joining a part of the lace to a previous part using a crochet hook). Or you could even sew the two halves of the point together with a needle and thread after making the lace (which is definitely cheating!) I didn't do either of these as I was trying to see what was possible without.
© Jo Edkins 2017 - return to lace index