
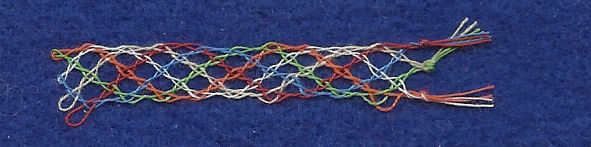
This is not a true piece of lace since it has floppy edges. Proper lace needs footsides and headsides. However, this sample will give you practice in cloth stitch, and in using pins at the edges. The photo of the finished lace is very enlarged so you can see the details.It is also turned round, which is the way you normally look at lace, but not the way you work it.
| Pattern: |  |
 |
Bobbins: 6 pairs
Style: sample
Stitches:
twist pair
half stitch
overhand knot
Details:
Torchon ground
Description: The pattern is above (the dots, joined together with lines). Print it. Prick the pattern and set up the pillow as before.
Wind 6 pairs of bobbins. Hang two pairs of bobbins from each pin along the top. I have wound a different colour of thread for each pair. You can do the same if you wish, or leave them all the same colour. There is no worker pair when working a ground. All bobbins are treated the same way. All your bobbins should be laid out on the pillow in pairs, in the same order that you hung them. It is best to make sure that the two pairs on each pin are connected. The best way to do this is to twist twice the middle two bobbins of the four. These are from different pairs. Twisting them twice means they end up back in the same order, but now the two pairs are looped together. (Look carefully at the photo above, and you will see what happens if you don't do this!)
You are now ready to start. Leave the pair on the left. Take the next two pairs and make a Torchon ground stitch with them. This means that you do a half stitch, then you put a pin in the left-hand hole in the second row, between the two pairs. Now do another half stitch, with the same two pairs again. Click here to see how to do a half stitch. When you've finished, the two pairs will have swapped positions.
You can work ground in more than one way (unlike solid cloth stitch). For each stitch, you need two pairs. One pair will be going diagonally from left to right, and the other pair will be going from right to left. But you don't work a row with the same pair of bobbins. If you want to work a row, then you do a stitch, discard both pairs of bobbins, and move onto the next two pairs. You work out which hole you're going to stick the pin in, and the two pairs should be coming from the pins immediately above, and to the left and right. Sometimes there is three stitches to a row, sometimes only two (as in the second row).
This can be confusing. I find it easier not to work a row of ground, but to work on the diagonal. Unfortunately, here we start from a horizontal line. So you need to work stitches until you have all stitches done above a diagonal line (it doesn't matter sloping which way). Then you find that you can work the same pair of bobbins right down the diagonal. Be a bit careful at the edges, though, to make sure that you pick up the right two pairs. You must never put a pin in a hole when either of the two holes above don't have pins in yet. These two holes will usually be in the same row, but at the edges, one hole may be from a previous row. Doesn't this sound confusing! But that is why the lines are there. The threads should travel along the lines. Click here for more about Torchon ground.
When you have done enough, finish the lace off with an overhand knot, as before. Take the pins out, and you can admire the finished lace. You can see that all threads go diagonally to the edge, then change direction and slope the other way.
Click here for more on how to make lace.
© Jo Edkins 2019 - return to lace index