

This explores various ways that you can introduce a new coloured pair..
Pattern:

Bobbins: 13 pairs (12 black - plus sometimes a worker pair in a different colour)
Style: Torchon
Stitches:
half stitch
cloth stitch
cloth stitch and twist
Details:
Torchon ground (grey)
diamond (red)
twisted footside (pink)
changing colour
Description:
Follow the links above for explanation of how to work the different parts of the lace.
This lace tries introducing a coloured pair in several ways, to see the effect.
The top diamond is conventional - worked in the same colour.

The next diamond has a new blue pair of workers. These were hung from the pin above the diamond. Unfortunately, this leaves a loop of that thread above the diamond.

The next attempt hangs the new pair from the top pin of the diamond. This is OK for that pair, but the two top passive pairs, which come in from left and right, are not worked at the top pin, so they travel down to the pin below.

The next attempt hangs the new pair from the top pin of the diamond, but arranged to the left of the top two passive pairs. The first row is across both these passives, plus the next passsive on the right. This is better, but the top right passive pair is still not right.

The last attempt starts by working the top two passive pairs (in cloth stitch) and puts a pin between them. Then the new worker pair was hung between them. This worked quite well!

Here is a larger scale photo, to see the working:

I decided to work this pattern again, to investigate how to finish the colour. In the past, I have tied off the worker pair with a reef or square knot. However, someone suggested just trimming the threads without a knot (which, admittedly, does show.) The following photos have the lace going downwards, so the finishing colour happens at the bottom. All these examples finish with the middle two pairs doinga a cloth stitch and twist, followed by a pin between them.

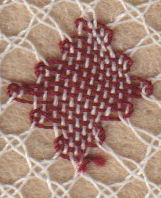
Dark red - This ties off (with a reef/square knot) the worker pair to one side of the middle two passive pairs. You can see where I trimmed the loose ends, but the knot isn't that visible.
Red - Here I trimmed the worker pair to one side of the middle two passive pairs. The loose endsaren't as visible, and it hasn't unravelled (yet).

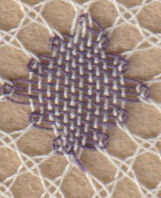
Purple - In the dark red example, I tied off the workers to one side of the two passive pairss. Here I tied the pair off between the two passive pairs. As the passives then immediately do a stitch, this seems to hide the knot and the ends.
Blue - Here I trimmed the workers (without a knot) when they were between the passive pairs. A mistake! The threads of the workers promptly unravelled to one side. It didn't unravel any more, but still not recommended.

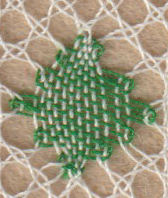
Green - This was an attempt to keep the ends of the worker pair in place. For the last two rows, I treated the 2 threads of the worker pair as if they were (together) a gimp. That is - instead of the passives going over and under the individual worker threads, they went over or under both together. This is to squeeze them together more, and hopefully trap the trimmed ends within the lace. It seems to have worked.

Then I tried scrumpling up the lace to see if the untied worker thread ends would unravel. It was surprisingly easy to smooth it out again! The red and green examples seemed to have held up well, but the blue one looks looser. But that was a problem anyway.
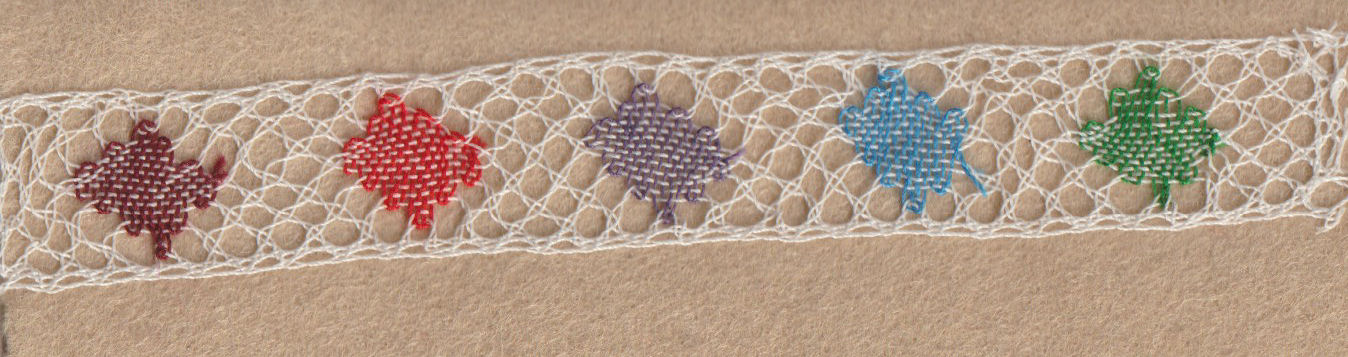
Conclusion: Personally I would tie off worker threads, The knot doesn't show much, especially if you tie off the worker pair between the two passive pairs, and then do a cloth stitch and twist of the passive pairs, and a pin in between them afterwards. However, if you want to avoid a knot, make sure that the last row using the work pair covers at least two passive pairs, before cutting them off. Treating the worker pair as a gimp for the last row (or two rows), so the two threads get squeezed together, may help to anchor to threads before cutting.
© Jo Edkins 2024 - return to lace index