
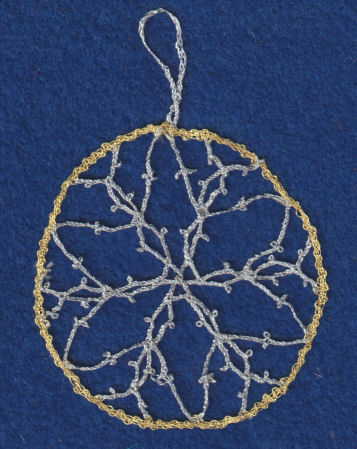
Reticella is a needle lace dating from the 15th century and remaining popular into the first quarter of the 17th century. I did something copying a panel I saw on Facebook (see pattern 569). But I thought that a few tweaks would make it easier to work. Also, it reminded me of a snowflake, somehow...
Pattern:
Bobbins: 9 pairs (3 pairs gold, rest silver)
Style: Plaited lace
Size: 2.5 inches across
Stitches:
plaits
picot
joining four pairs (lazy join)
joining six pairs
cloth stitch
twist pair
making a sewing
Description:
Follow the links above for explanation of how to work the different parts of the lace.
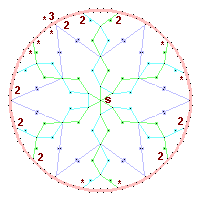
The pattern marks with a number where the pairs start. The "*" mark where the pairs are tied off. There are 3 pairs working the framing circle in cloth stitch. Make sure that when you start the other pairs, they are workied into this frame (by doing a row of cloth stitch inwards, and putting the pin in, then hang 2 pairs from the pin, and work the gold workers back across new pairs and the gold passives). Tie off the silver pairs in a similar way.
You work two of the arms, ending by tying off. Then the new two, and so on. This shows the direction of working for one of the arms.

This means that these pairs of arms need to be joined in the centre (marked with "S", for sewing). For the first pair of arms, make the central plait long enough to go to the centre, round a pin, and back to the next join. For the next pair of arms, at the centre, take out the central pin, and use a crochet hook to hook two of the threads through the hole caused by the first pair of arms. Put back the pin, pull tight, and carry on with the plaiting. Do the same for the third pair of arms.
One plait (made of 2 pairs) is only started and tied off once. This makes a star shape. It crosses the other arms in a 6-way join (see above).
There are a lot of internal picots. Be careful what order you do the plaits, otherwise you'll have to do a picot amoung pins, which is not easy!

Close up of the lace, so you can see the working in more detail
© Jo Edkins 2025 - return to lace index