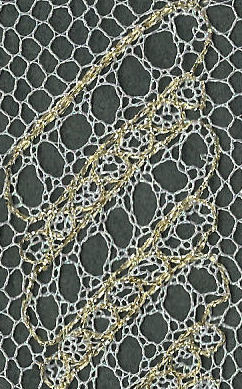
Bucks Point stripe. See pattern 311.
These Bucks Point stripe are made up of alternate bars and small beads. It is made of honeycomb surrounded by gimps. I suggest that you understand all these before trying stripes.

Stripes pattern
The diagram below avoids the complexities of the individual stitches by showing each pair of threads as a single line. Where one line crosses another inside the stripe, you should work it as half stitch and twist, pin, half stitch and twist (or honeycomb). The gimp is shown in pink. Click here to see how to work a gimp. Outside the gimp is not part of the stripe, and so will be worked in whatever stitch is required - perhaps a headside or ground.
|
|
Working: These stripes are alternate bars and small beads. This description does not cover the detailed working of these - click on the links to see that. Instead it describes how the gimps move from one stripe to the next.
Once all the pairs have been worked through the top gimp, the bar is worked as a single unit. You do need to take a single pair outside the gimps, both to the left and right, to work the sides.
Choose the correct gimp to be a bottom gimp. This must travel from the bottom to the top of of the bar, which means it goes 'uphill'! There is not a problem however - just take it along the diagonal. As all pairs are worked through this gimp, do not twist the pairs afterwards.
The other gimp needs to just be taken round the side of the bar, and the two gimps cross near the top. Take care which gimp crosses which pair, and which pinhole is inside or outside the gimps.
You should now be in position to work the small beads. These are surrounded by gimps at top and bottom, which cross over between the beads. The pairs need to be twisted after the gimp and before working the inside of the bead. This squeezes together the gimp surrounding the bar with the gimp surrounding the bead. However, do not twist the pairs after the bottom gimp.
Both gimps are now at the bottom of the stripes. Having done the last cross-over of the beads (which is in a slightly different place to the others) one gimp must run uphill again to surround the next bar. Remember to twist all pairs after this gimp, again to squeeze together the gimps from the two stripes.
© Jo Edkins 2017 - return to lace index