
This introduces spiders.
| Pattern: |  |
 |
Bobbins: 12 pairs (10 one colour, 2 second colour)
Style: Torchon
Stitches:
half stitch
cloth stitch and twist
twist pairs (for spider)
cloth stitch
Details:
Torchon ground (grey and pink)
double Torchon ground (pink)
8 legged spider (blue)
twisted footside (grey)
Description:
The middle top pin must have two pairs of the second colour hung from it. The main colour pairs are hung from the other top pins. This is important to make this pattern work. It separates the spiders from the ground. Spiders (especially small ones) are rather like ground, and they need this separation.
The Torchon ground and footside is as previous patterns. The pink line is also (mostly) Torchon groun, but when you get to the "kink" you need to do that pin as a double Torchon ground stitch (cloth stitch and twist, pin, cloth stitch and twist). The reason for this is that in normal Torchon ground, the pairs swap over. But with double Torchon ground, the pairs go round the pin and end up on the same side - giving the kink!
Once you have done the bit above the spider (including the pink lines), you do the spider. This has a number of "legs". These are twisted pairs. You twist them LOTS of times - I tend to do 6 twists. It depends a bit on thickness of threads and size of pattern, but once you decide on a number, do it the same for all the same size spiders in the pattern.
The body of the pattern is all done in cloth stitch. Divide the pairs into two equal sized groups. Take the right pair from the left group (the pair nearest the middle) and work it across all pairs on its right. Push it to the far right, because it mustn't get used in the next row! Take the other left pair and work it across the others on the right (but NOT the previous workers!) This means that the two pairs on the left has been worked in cloth stitch across the two pairs on the right. (By the way, it doesn't matter is you work the left two across the right two, or the right two across the left two. Spiders are symmetrical.) Put the pin in between the two groups. Tighten well. Now do exactly the same again. The legs end up in the same order they started, but they've gone round the pin. Now twist all the pairs to give the bottom legs.
Problems with spiders:
Not twisting enough times (or forgetting to twist at all!) Twisting makes the body firmer, as the twists push the cloth stitches in the body together more.
Twisting too much - the legs can go floppy. But don't worry - there is a good range of twisting numbers that work fine!
Working in cloth stitch across not just the group on the other side, but across the worker in the previous row as well. Each "row" is the same length.
Tightening - there is rather a mess above the pin. If it won't tighten well, then try some tightening techniques. There is also a problem below the pin. You might tighten the threads, and then see them all flop apart again. By all means do a tighten at the end of the spider (doesn't do any harm, and might do some good), but also tighten after the framing stitches for the spider. In this pattern, this is the pink line of stitches. It's always easier to tighten against a pin.
Bigger spiders with more legs - They're not in this pattern, but you do them exactly the same way. Lots of twisting of pairs (maybe more, as the legs are a bit longer. Divide the pairs into two groups. Work all pairs on one side across all pairs on the other. Pin. Do the same in reverse. There are more threads, so tighten carefully. You'll find that the spider body gets bigger, and more oval. It just happens that way.

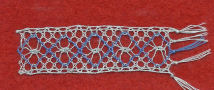
Close up of the lace, so you can see the working in more detail
© Jo Edkins 2019 - return to lace index