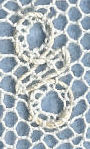
Bucks Point bee. See pattern 69.
This bee's wings are made of honeycomb surrounded by gimps. Its body is Torchon ground. I suggest that you understand all these before trying bees.

bee pattern
The diagram below avoids the complexities of the individual stitches by showing each pair of threads as a single line. Where one line crosses another inside the wings, you should work it as half stitch and twist, pin, half stitch and twist (or honeycomb). Inside the bee's body is a short line of Torchon ground. This perhaps non-standard! But it makes the bees body different to the surrounding net. The gimps are shown in pink and purple. Click here to see how to work a gimp. Outside the gimp is not part of the bee. It will probably be Bucks Point net.
|
|
Working: Hang the gimps from a pin at the top of the bee. (While there are two gimps which work separately, they can be wound and hung as a pair at the start). Work the gimps (marked in pink and purple) through two pairs on either side to outline of top of the first wing.
The wing is a single unit of honeycomb. As usual, half-way through, an edge pair has to be taken outside the gimp on that side, worked with a ground stitch (probably Bucks Point net), then back across the gimp.
The gimps are worked back across the two pairs on each side. Then the gimps cross. Some ground stitches need to be worked to get the pairs in the right place. The gimps are again taken across two pairs on each side, to make the body of the bee. But the body is a straight, diagonal line. So while on one side the gimp crosses the two pairs from the top wing immediately, on the other side there are some ground stitches in between the wing and the body.
The body of the bee is a line of 4 Torchon ground stitches. (This is to make it diffferent from the ground or the honeycomb. You could try other stitch types if you like).
The gimps are worked across the pairs from the body of the bee, and crossed over. Again, some more ground stitches are needed to get the pairs down to the start of the second wing. The gimps then work throuh two pairs on each side, as before. The second wing, like the first, is a single unit of honeycomb, which needs, halfway through, the edge pairs to cross the gimp, do a stitch with ground, and return, as before. When the honeycomb hexagon is complete, the gimps surround the bottom of the wing, cross, and do a couple more to provide the overlap. This makes a neat end - see how to work a gimp.
As the gimps are now finished, you can either cut them off, or put the gimp bobbins towards the back of the lace, out of the way, to be cut off later. Carry on working the ground underneath the bee.
I have defined the bee as using honeycomb, because it has to use a hexagonal ground, so it seems natural to use Bucks Point stitches. However, it is possible to use Kat stitch (half stitch, pin, half stitch) instead. See pattern 316, which uses Torchon ground as well. It is necessary to still use a hexagonal grid to get the shape of the bee right, so the surrounding Torchon ground can look a little odd!
You can also have a smaller bee. Here, the wings have 4 pins, not 6 (so technically they are twisted hole ground rather than honeycomb. The body has both gimps crossing, then going to each end of the body, round a pin, back across each other to go to the bottom wing. There are no stitches within the body. There is a slightly tricky couple of stitches near the ends on the body. One has to be done before the gimp's pin, and the other after. See the pattern!


© Jo Edkins 2017 - return to lace index