If you are a complete beginner in lace-making, then I suggest that you start on the Beginner patterns. Start with the samples, and try a few of the other beginner patterns as well. You need time to learn how to handle your bobbins and pillow and pins, and also how to do the basic stitches with confidence. Click here to find out about equipment, and how to get started.
Once you are happy with the basics, you can look through my Torchon strip patterns. They are listed by number of bobbins, and there are pictures on the index to help you choose. Some are quite complicated ideas, and some don't even really work! I tend to put up my mistakes as well as the patterns that do work, partly so other people can learn from them, and also, so that everyone realises that other people make mistakes too!
Some of my patterns use colour. You can always ignore the colour, and just use the same colour throughout. If you would like to learn about using colour, try some lace from Panama. The patterns are (mostly) quite simple, and you will impress other lacemakers by your knowledge of a foreign lace!

Click here for Panama lace patterns
Click here for more on the principles of using colour in Torchon lace.
Torchon lace is a good place for beginners to start, but you might like to learn another style of lace. Bucks Point is attractive:

Click here for Bucks Point patterns.
Or there is English Midland lace.

Click here for English Midland patterns.
Once you feel that you have done some reasonable pieces of lace, you may feel, what next? You want to make something that you can use, or something to give to someone else. So this page is suggesting some projects for you to try. Some are simple and there are some harder ones as well.
One project often suggested to beginners is a bookmark. This is just a strip of lace of the right size and shape. There are lace suppliers who do plastic sleeves for bookmarks.
A book mark should probably be symmetrical on both sides to look really neat (although this isn't essential). That means that it should have footsides on both sides or headsides on both sides. It should also start and finish neatly. Probably the most typical shape for a bookmark is a pointed top and a straight end, possibly with a knotted fringe. The snake pattern, below, is one example. But you could try any pattern that you enjoy making.
Another simple project is to make a card featuring your lace. You can buy blank cards in craft shops, or card to make your own blank card. Make two slits in the front of the card, then poke the lace through the slits so the ends are inside the card. Tape the ends to secure them.

There should be a contrast between the lace colour and the backing. So either buy card of a good contrasting colour, or stick on paper of a good colour behind the lace. Or of course make the lace in a different colour! You may also want to stick paper over the start and end of the lace which ends up inside the card, to tidy it up.
You could write on the front of the card, or stick on a picture, or even just make the lace the only element on it. The lace could be in the centre rather than along the edge, or it could be horizontal rather than vertical.
If you can't find blank cards or card anywhere, you can make a simple card by taking A4 paper (ordinary paper that you use to print out from the computer) and fold it in four. This will strengthen it enough to make it a card. Only make the slit in one quarter of the card - the bit that will end up in the front. After poking the lace through and taping it into position, you can stick half the paper to the other half, so you end up with a card. But before making slits or taping or gluing anything, hold it in your hand and open the card, and make sure that you're doing it in the right place, and the lace is in the front, and not upside down! Also, if you are using white paper, either have a lace strip of a dark colour, or put some contrasting paper behind the lace, to show the pattern.
Traditional lace patterns are usually for simple lace edging. It has a headside on one side, and a straight footside on the other, where you sew it onto the fabric. You can use this to edge handkerchiefs, or sleeves, or underwear, or anything else. There are a couple of problems with this, though. Most people don't wear lace as part of normal clothing which is seen, and it seems a shame to make lace which isn't going to be seen! More to the point, you may have to make quite a long piece of lace to edge something, and if you want lacy decoration to your sleeves at your wrists, remember that there are two of them, so you need to do twice as much. Such long pieces of lace will require a roller pillow or bolster to make.
Once you have made the lace, you will need to sew it to the fabric. You can either sew it so the lace projects beyond the fabric, or overlapping.
If you do an edging to a handkerchief or round a mat or doily, then you will need to go round corners (see below). However, if you don't feel that you can manage corners like this, you can make a straight piece of lace, then gather it to go round the corner. Many lace edgings are gathered throughout their length. This gives more of a 'frilly' effect to the lace. It also means that you need to make a longer piece of lace! Make the lace as usual, then run a thread through the footside. Gradually pull the thread tight, until you get the amount of frilliness that you want. Then pin the lace in place on the fabric and sew it.
Another type of decoration is an insertion. This has a footside on both sides. You cut a hole in the fabric the size and shape of the lace, and sew in the lace as a replacement. The colour of the garment below (or bare skin!) will show through. This is a specific style of decoration which isn't really used any more.
You can, of course, just sew on a piece of lace as a decoration on your clothes without it being either an insertion or an edging.
If you can't face making a piece of lace to go right round a handkerchief or mat, then you can work just one corner. It is quite easy to make a triangle with Torchon lace. You can either cut the corner off the fabric and replace it with the lace triangle, or you can sew the lace over the corner of the fabric. Click here for corner patterns, which includes how to make them.
Torchon lace (and many other styles as well) is made as a strip. You keep a fairly constant width to the lace, and work as much length as you want. However, you can make the lace turn a corner (click here to see how). If you fill the centre with cloth, then you have a simple mat (click here to see how to sew the fabric inside the lace). Click here for patterns.
It is possible to make a square mat completely of lace. Click here to see how. Click here for patterns.
You can also have a hexagonal mat. Click here to see how. Click here for patterns.
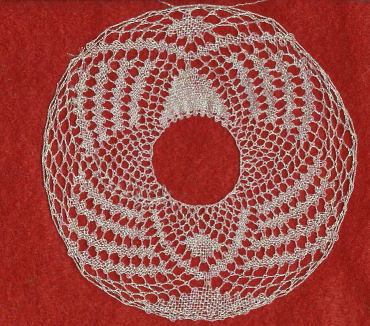
There are two types of circular mat. One has a hole in the centre (which you can fill with fabric or not, as you choose). I call these roundels. Click here to see how to work them. Click here for patterns.
The other type of circular mat is really a distorted square mat. Click here to see how to work them. Click here for patterns.
One problem with lace mats is making them big enough. Bobbin lace is very restricted in how wide you can make it, as more width means more bobbins, and there is a definite limit to the amount of bobbins that you want to handle! You can make a small centre to a mat, then an edging to go round it, and either link them together with a sewing (using a crochet hook) while making the second piece, or sew them together after.
You can even make a third edging to go round the lot! Old lace mats frequently used this technique.
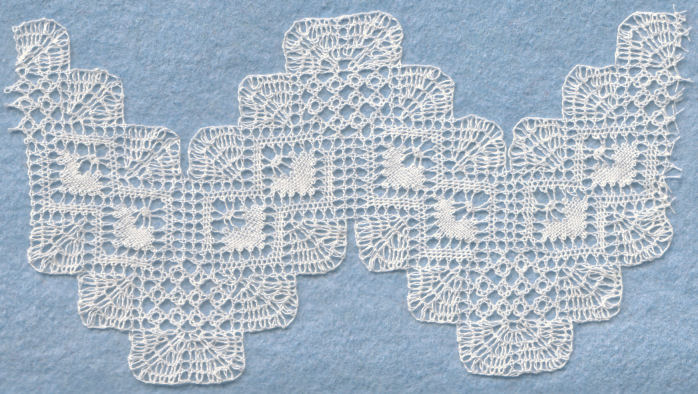
Another approach is to make the mat as a piece of tape lace. I have not done much of this, I must admit, but there are a few patterns here.
For big mats, the size of the pillow tends to be the limiting factor.
It is fun to experiment with thread other than normal cotton or polyester. Click here for more on that. The most obvious fun thread to use is metallic or sparkly thread (I call them "bling" threads!) These can be bought through lace suppliers or in haberdashery shops. They are good to use for Christmas decorations, for hanging on Christmas trees or elsewhere. You can make small items, which don't take long, look impressive, and are very light and small so they are easy to send through the post. Perfect presents!
Click here for more about Christmas decorations. Click here for patterns.
If you know someone that is getting married, you can make them a wedding garter. Brides treasure them as future heirlooms! This has to be quite a long piece of lace, and it needs holes in for a ribbon.
Click here for more about wedding garters. Click here for patterns.
A cross is an interesting shape, and you may know someone who would value it as a present. Click here for patterns for both small and large crosses, including how to make them.
A fan is a fun thing to make! It is challenging, though. Click here for more about making a fan. Click here for patterns.
A collar is a large shape which can be challenging to fit on a pillow. Click here for some ideas as to how to do this. Click here for ideas for patterns.
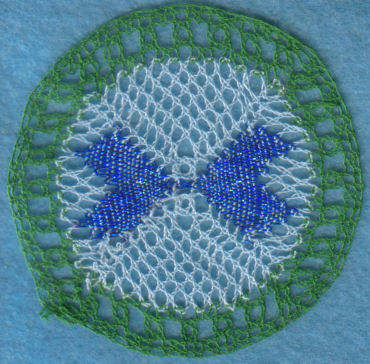
This is a round or hexagonal piece of lace with beads round the edge. You put it over an open jar or jug to stop insects getting in when you are outside. Click here for patterns.
A "wiggle" is a lace shape that I think I invented (although other people may have come up with the same idea). I am not sure what you could use it for, but it is definitely fun to do!Click here for how to work a wiggle. Click here for patterns.
Another fun activity is using a variable grid. Click here for patterns.
You may want to make lace on a particular subject, rather than in a particular shape or for a given purpose. Click here for patterns using hearts, flowers, animals, and more.

Pattern 97 (supposed to be peacocks!)
Finally, I challenge you to design your own lace! This is easier than you might think, and it means that you will never be dependent on other people's patterns again. Click here to find out how, including getting started, making a pattern from an existing piece of lace, general principles, a design kit, and interactive pages which do a lot of the work for you! Plus the necessary grids to work on.
Pattern 32 (my first lace pattern!)
© Jo Edkins 2017 - return to lace index